Monday, July 7, 2025

Lori Whitlock Creative Team Blog Hop July 2025


Hello! Welcome to the blog hop. Today the hop order is Lori, Brandie, Ashley, Cathy, Chelsea, Sue, Noelene, and Tamara. We are glad you are here. This month I made the cute A2 Shaped Box Card Chicken (SVG). I was inspired by the new Chickens collection by Echo Park Paper Co. This card is so quick to cut and assemble and the paper collection is darling.
 

Thanks for hoping along today. Ashley is up next. Be sure to get your free file and enter the giveaway!

Brandie   


a Rafflecopter giveaway

Thursday, July 3, 2025

3D Flowerpot Bouquet

Hi there friends! Today I am sharing a tutorial for the 3D Flower Pot Bouquet Daisies (SVG, Silhouette). This flower bouquet would make a perfect hostess gift, birthday gift, or a sweet pick me up for a friend. I used the Stars and Stripes collection by Echo Park Paper Co for a patriotic theme. 

To begin this project, I cut all the flower pieces first so that I could shape the flowers while my Cricut cut the remaining pieces. The flowers have five layers total. Two of the layers make the flower and three for the centers. I used a stylus tool and a foam mat to shape my flowers. This process takes a little time but wasn't complicated. 


For the pot I folded all of the score lines into mountain folds, inked the edges, and glued the decorative panels in place. Two of the sides of the pot have two large tabs each. I added glue to one tab at time and made sure to line everything up with the edge of the pot. I repeated this process for all four corners.   


I then glued into place the four grass panels to the inside of the pot, one on each side. For the inserts I folded all of the tabs into a valley fold and added glue to outside of the tab. I eyeballed this part but I tried to make a sure the number three insert was in the middle of the pot.  There is five inserts total, three for the flowers and two grass inserts. I inserts are numbered which makes gluing them in order easier. 


With all the inserts glued into the pot I folded down the round heads for the flowers and leaves. I glued the leaves on first then glued the flowers on top of that. 


I embellished my pot with a sticker from the collection and added enamel dots to the centers of all of the flowers. 


This was a fun little project and would be cute in any theme. I think my next one is going to be back to school themed, since my kid goes back in three weeks!

Thanks for stopping by.

Brandie 

Monday, June 9, 2025

Lori Whitlock Creative Team Blog Hop June 2024


Hello and welcome to the June 2025 blog hop! The order this month is Lori, Traci, Brandie, Ashley, Cathy, Chelsea, Sue, and Noelene. This month I made the Shaped Card Flamingo (SVG, Silhouette). I love the smiley eyes and the fun roller skates I gave her! The papers and stocker came from the Have a Great Summer collection by Echo Park Paper. 


I hope you have a great summer! Ashley is up next. 

Brandie 


a Rafflecopter giveaway

3D Flower Pot

Hello! Today I am sharing one of the new 3D Flowerpots. I made the 3D Flower Pot 6 (SVG, Silhouette). I included a Thinking of You sentiment and added a battery powered light to the inside of the flowerpot. This little flowerpot is perfect to give to someone who needs a little pick me up. I used papers and embellishments from the Firefly collection by Echo Park Paper. 


Thanks for stopping by!

Brandie 

Thursday, May 15, 2025

Box Card Flower Trunk Tutorial

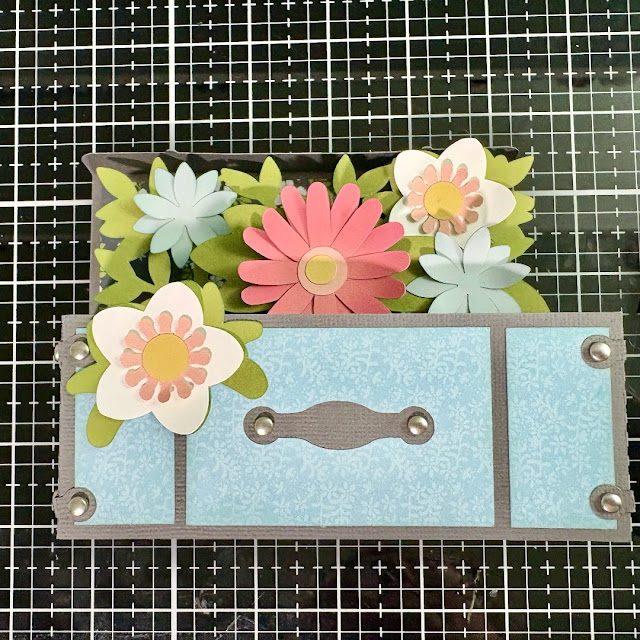
Hello crafty friends! Today I am sharing an assembly tutorial for the Box Card Flower Trunk (SVG, Silhouette).  I used papers from the Day and Life collection by Echo Park Paper Co. I also cut a few extra flowers to add to my card to give it a fuller look.


The body of the box card is in two parts that will be glued together. The tabs are all folded in a valley fold. First I inked the edges of all of my pieces then glued the decorative panels to the outside of my trunk. I then assembled the flowers. All of the flowers have two layers. I then glued the flowers to the two inserts. Three of the flowers are on the front insert and two flowers on the back insert. 


For the trunk I added glue to both tabs and made sure to line up the holes on both pieces so that the brads would be fit. I then glued the decorative corner pieces to the trunk and added the brads to all of the holes. Enamel dots would also be cute on the holes if you can't find brads. After I had all the brads in place I glued the back decorative panel into the trunk.


Next I folded the tabs on the inserts in a valley fold and added glue to the back of the tabs. Securing one tab at a time I lined up the edge of the tab with the top of the trunk and held it in place while the glue set. I was also careful to not glue the tab over the back of the brad. I repeat the process for the other side of the insert. With both tabs glued I fold the card flat to check that it will fold flat then repeat the process for the second insert.


With both inserts secure I glued the last flower and stem to the front of the trunk.  I then embellished my trunk with the additional flowers and two butterflies I fussy cut from the collection. 


This card is so pretty and has several sentiments for the back of the card that are included in the file.

Thanks for stopping by today!
Brandie 

Monday, May 12, 2025

Lori Whitlock Creative Team May 2025 Blog Hop

Hello! Welcome to the May blog hop. The hop order this month is Lori, Traci, Brandie, AshleyCathy, and Chelsea. Today I am sharing a graduation card I made for one of my nieces. I used the Box Card Envelope Graduation (SVG, Silhouette). Her school colors are red and white, so I used a cute red paper from the School Rules collection by Echo Park Paper. This school year has flown by, most of the schools in my area only have eight days left! 


Thats all for me today, Ashley is up next. 

Brandie 


a Rafflecopter giveaway

Monday, April 7, 2025

Lori Whitlock April 2025 Creative Team Blog Hop


Hello! Welcome to the April blog hop! The hop order this month is Lori, Brandie, Ashley, Cathy, Chelsea, Sue, Noelene, and Tamara. Today I am sharing the Slimline Vertical Easter Chick Card (SVG, Silhouette). The little chicks are darling and come together in a few steps. The paper is from the Easter Wishes collection by Echo Park Paper Co from a few years ago.


Thanks for hopping along today, Ashley is up next!

Brandie


Belly Box Easter Bunny 2

Hello there crafty friends! Today I am sharing the Belly Box Easter Bunny 2 file (SVG). I made these for my kid's teachers and a few coworkers. This little bunny is so cute and holds just the right amount of chocolate!


Thanks for stopping by today and Happy Easter!

Brandie


Thursday, March 13, 2025

Spring Flowerpot Box Card Tutorial

Hello crafty friends! Today I have a quick assembly tutorial for one of the new Flowerpot box cards. I used the Box Card Spring Flower Pot file (SVG, Silhouette). This file is so bright and cheerful. It has several print and cut sentiments so that it can be used for any occasion. I used the Happy Birthday sentiment, and the papers are from the Our Happy Place paper collection by Echo Park Paper Co. 

The box part of this card comes in two separate sections with two decretive panels on each. These two sections are glued together side by side. It also has two rim pieces that will be glued on the front and back of the card. The rim pieces hang over the edge of the pot a little so be sure not to add glue all the way to the edge of the paper. I glued the pot all together forming the square before adding the inserts this time as well. 


Before the inserts are added to the box card the flowers need to be assembled. All of the flowers have multiple layers for added dimension. The file does come with centers for the flowers, but I used enamel dots for mine. After all of the flowers are assembled I added them to the inserts. Inserts one and two are the only ones with flowers. The third insert is plain green.  


The tabs on all of the inserts are folded into valley folds and glue added to the backs of the tabs. I held the tabs folded down and slid the insert into the box, made sure the top of the tabs was flush with the top of box and front of the tabs was flush with the front of the box. After I had the tabs lined up, I folded the box card flat in both directions to make sure everything would lay flat. I then added the remaining inserts the same way but using the insert in front as the guide. 
 

With the inserts all in place I then glued the flower and sentiment to the front of the box. 


I love how versatile this box card can be. Thanks for stopping by today!

Brandie  

Sunday, February 16, 2025

Succulents Box Card

Hi there crafty friends! Today I am sharing the Box Card Succulents card (SVG). I was inspired by the Our Happy Place paper collection by Echo Park Paper. This collection has lots of potted plant imagery and a lovely color palette. I thought this box card would make a cute card for a plant lover. I added a few pen details to the cactus and a good vibes sticker from the paper collection. 


I love the how this one turned out. Thanks for stopping by today.

Brandie 

Wednesday, January 22, 2025

Valentine Rainbow Box Card Tutorial

Hi there friends! Today I am sharing a tutorial for one of the new Valentines box cards. You can find the bundle here. I made the 5x7 Box Card Valentine Rainbow (SVG, Silhouette). This card would be really easy to customize too. The sentiment is a print and cut and could be swapped out for a birthday, new baby, anniversary, or left off completely. 

The papers and stickers come from the Valentines Day collection by Echo Park Paper Co. Once I had everything cut out, I inked the edges of the pieces for added depth. I also added some white highlights to my ballons with a white paint pen. I then glued the colored paper on the inside front card for the heart arch. Starting the with the largest arch I glued the rainbow down to the front of the box card body. This box card only has one insert. I glued the ballons first, then the banner, last the flowers. I didn't cut the flower middles opting for some enamel dots.


I folded the tabs into valley folds and added the glue to the back of the right tab. The right tab is lined up with the inside score line of the box card body. I then added glue to the back of the left tab, folded the left side of the box card over on top of the glued tab, then added glue to the tab of the box card and folded the front of the card over. 


I added a couple of stickers to the front of the box card from the collection. 


This card is so pretty and a fun way to show someone you care. Yay love! 

Brandie