Thursday, August 22, 2019

Pumpkin Shelf Sitter

Hi there crafty friends! I have an easy Fall décor tutorial to share today! I love Fall, the colors, smells, and cooler temperatures. Another of my Fall favorites is pumpkins. I usually start pulling out my pumpkins this time of year. I want to enjoy them for as long as possible before all the Christmas holiday stuff shows up.


I used the pumpkins from the Pop Up Box Card Pumpkins (SVG, Silhouette). I like that the pumpkin segments are separate giving the pumpkins some depth. I cut two layers of chipboard and one layer of cardstock or pattern paper. When cutting the chipboard go slow and make several passes. I used my machines preprogramed setting and did not have any troubles. The plaid paper comes from the new Echo Park My Favorite Fall collection.

The width of the large pumpkin is 11.5 and the width of the small pumpkin is 6.5. I used the Scotch tacky glue to glue each layer. Then placed a heavy book on top of the pumpkins while the glue dried.
Before I assembled the pumpkins I inked the edges with Vintage Photo Distress Oxide ink. I then used tacky glue to assemble the pumpkin layers.

I tied some raffia and ribbons from my stash around the stems. I then glued the smaller pumpkin to larger one.


Now these cuties will be sitting on my bookshelf all season. I hope this project inspires you to use Lori's cut files in your crafty décor pieces. Thanks for stopping by!

Brandie

Monday, August 12, 2019

Lori Whitlock Creative Team August 2019 Blog Hop


Hi there and welcome to the creative team August blog hop! The order this month is Traci, Kathy, Brandie, Michelle, Aimee, Ashley, Cathy, and Michelle.

I am sharing this cute Teacup Box card (SVG, Silhouette). I just love how this card turned out. The colors remind me of summer and it will make a beautiful birthday card for someone special.


That's it for me today.  Michelle is next. Thanks for hopping along with us!


Be sure to add this cut file to your cart, its FREE today!


And who doesn't want to win free money!


a Rafflecopter giveaway

Camera Box Tutorial

Hi there friends! Brandie here with a tutorial for the Camera Shaped Box (SVG, Silhouette). This little box is darling and would make a cute gift box, décor piece, or to hold a mini album! I will be placing pictures from a vacation in mine and setting it on the bookshelf with my other photo albums.


I wanted my box large enough to hold 4x6 pictures. I added a 4x6 rectangle then I selected all of  the camera images and enlarged until the rectangle fit inside the middle box shape.

 
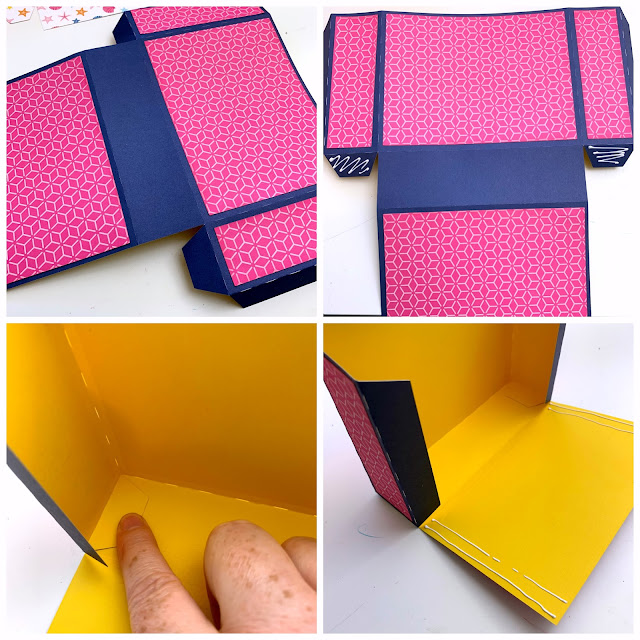
For the lens and top dial. I folded all of the score lines as mountain folds.  I then applied a small amount of  liquid glue to the triangle tabs. The triangle tabs attach to the rectangle next to it creating a corner of the octagon. Once the octagon is complete I folded the tabs in creating a base for the bottom of the octagon box. I applied liquid glue to one of tabs and anchored the bottom piece of the octagon box. After the anchor was secure I applied glue to the remaining tabs and folded the bottom into place. Hold the octagon for a few seconds while the glue takes hold.


Each of the octagons has a layering piece. The large octagon has four layers and the small octagon has one. I inked around the edges of the octagon and applied the layers with liquid glue.


While the box was still flat I glued the decorative panels into place. I then folded all the score lines into mountain folds. I glued the smallest tabs into place first creating the base of the box. The remaining open side of the camera body is a little shorter so I applied glue to the side of body flap rather than the tabs.  


The lid only has four tabs to glue and no decorative panels. I applied glue to the tabs and tucked into place. 


With the lid on the box I glued the two octagons into place as well as the viewfinder rectangle and flash circle. 


 I also added a few little things to embellish my camera box. All of the papers and embellishments are from the Echo Park collection I Love Summer. 


That's it for me. Thanks for stopping by and  I hope you all are enjoying your summer!

Brandie


Strawberry Jam Box Card with Brandie

Hi there friends! Brandie here with another darling box card. This cutie is apart of the Box Card Vintage Home Bundle or you can also find it alone as the Box Card Strawberry Jam (SVG, Silhouette). This card would make a sweet birthday card, a happy hello card, a thank you card or whatever you need card. I love when a card design can work for so many occasions!


I added some enamel dots for my flower centers and embossed the strawberries for added texture. The buffalo check paper comes from the Forward with Faith collection by Echo Park and the green pattern paper is from the Summer Adventure  collection by Echo Park.


 That's it for me today. Thanks for stopping by!

Brandie

July 4th Box Card

Hi Friends! Brandie here sharing the 5x7 Box Card July 4th. (SVG, Silhouette) I have always had a soft spot for box cards and I just love that Lori has a box card for every occasion. This cutie comes together quick and easily.


Thanks for stopping by today and have a safe and happy 4th of July!

Brandie